2023. 12. 7. 21:18ㆍ아두이노 (Arduino)
실습 12, 13주차 (ESP32 실시간 주식시세 표시)
이번주 실습에서는 ESP32 보드와 텍스트 LCD를 이용하여 실시간으로 주식시세를 표시해 보려고 한다.
목차
ESP32와 16x2 LCD 연결
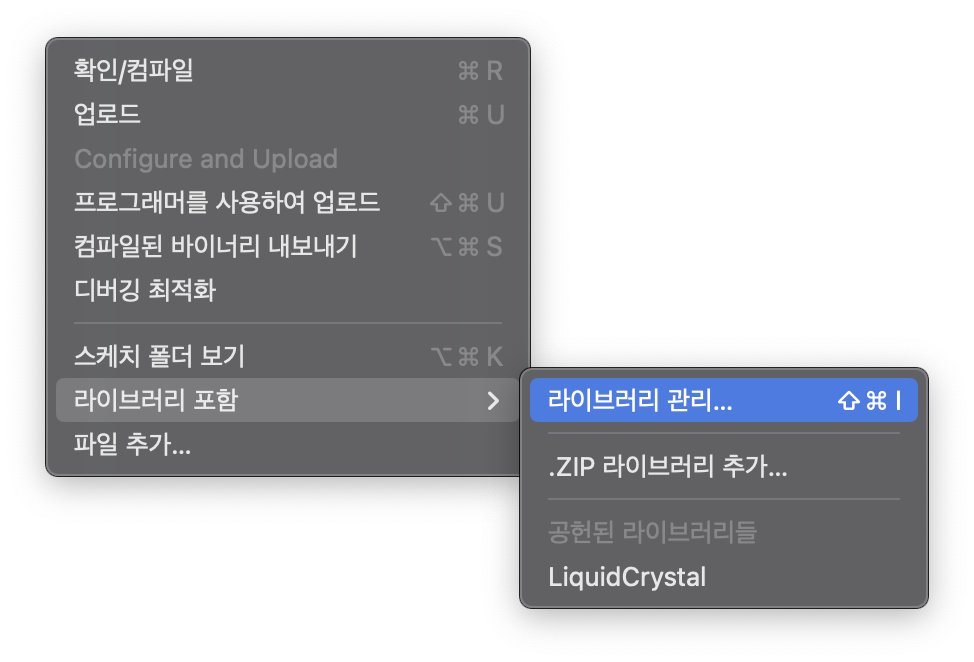
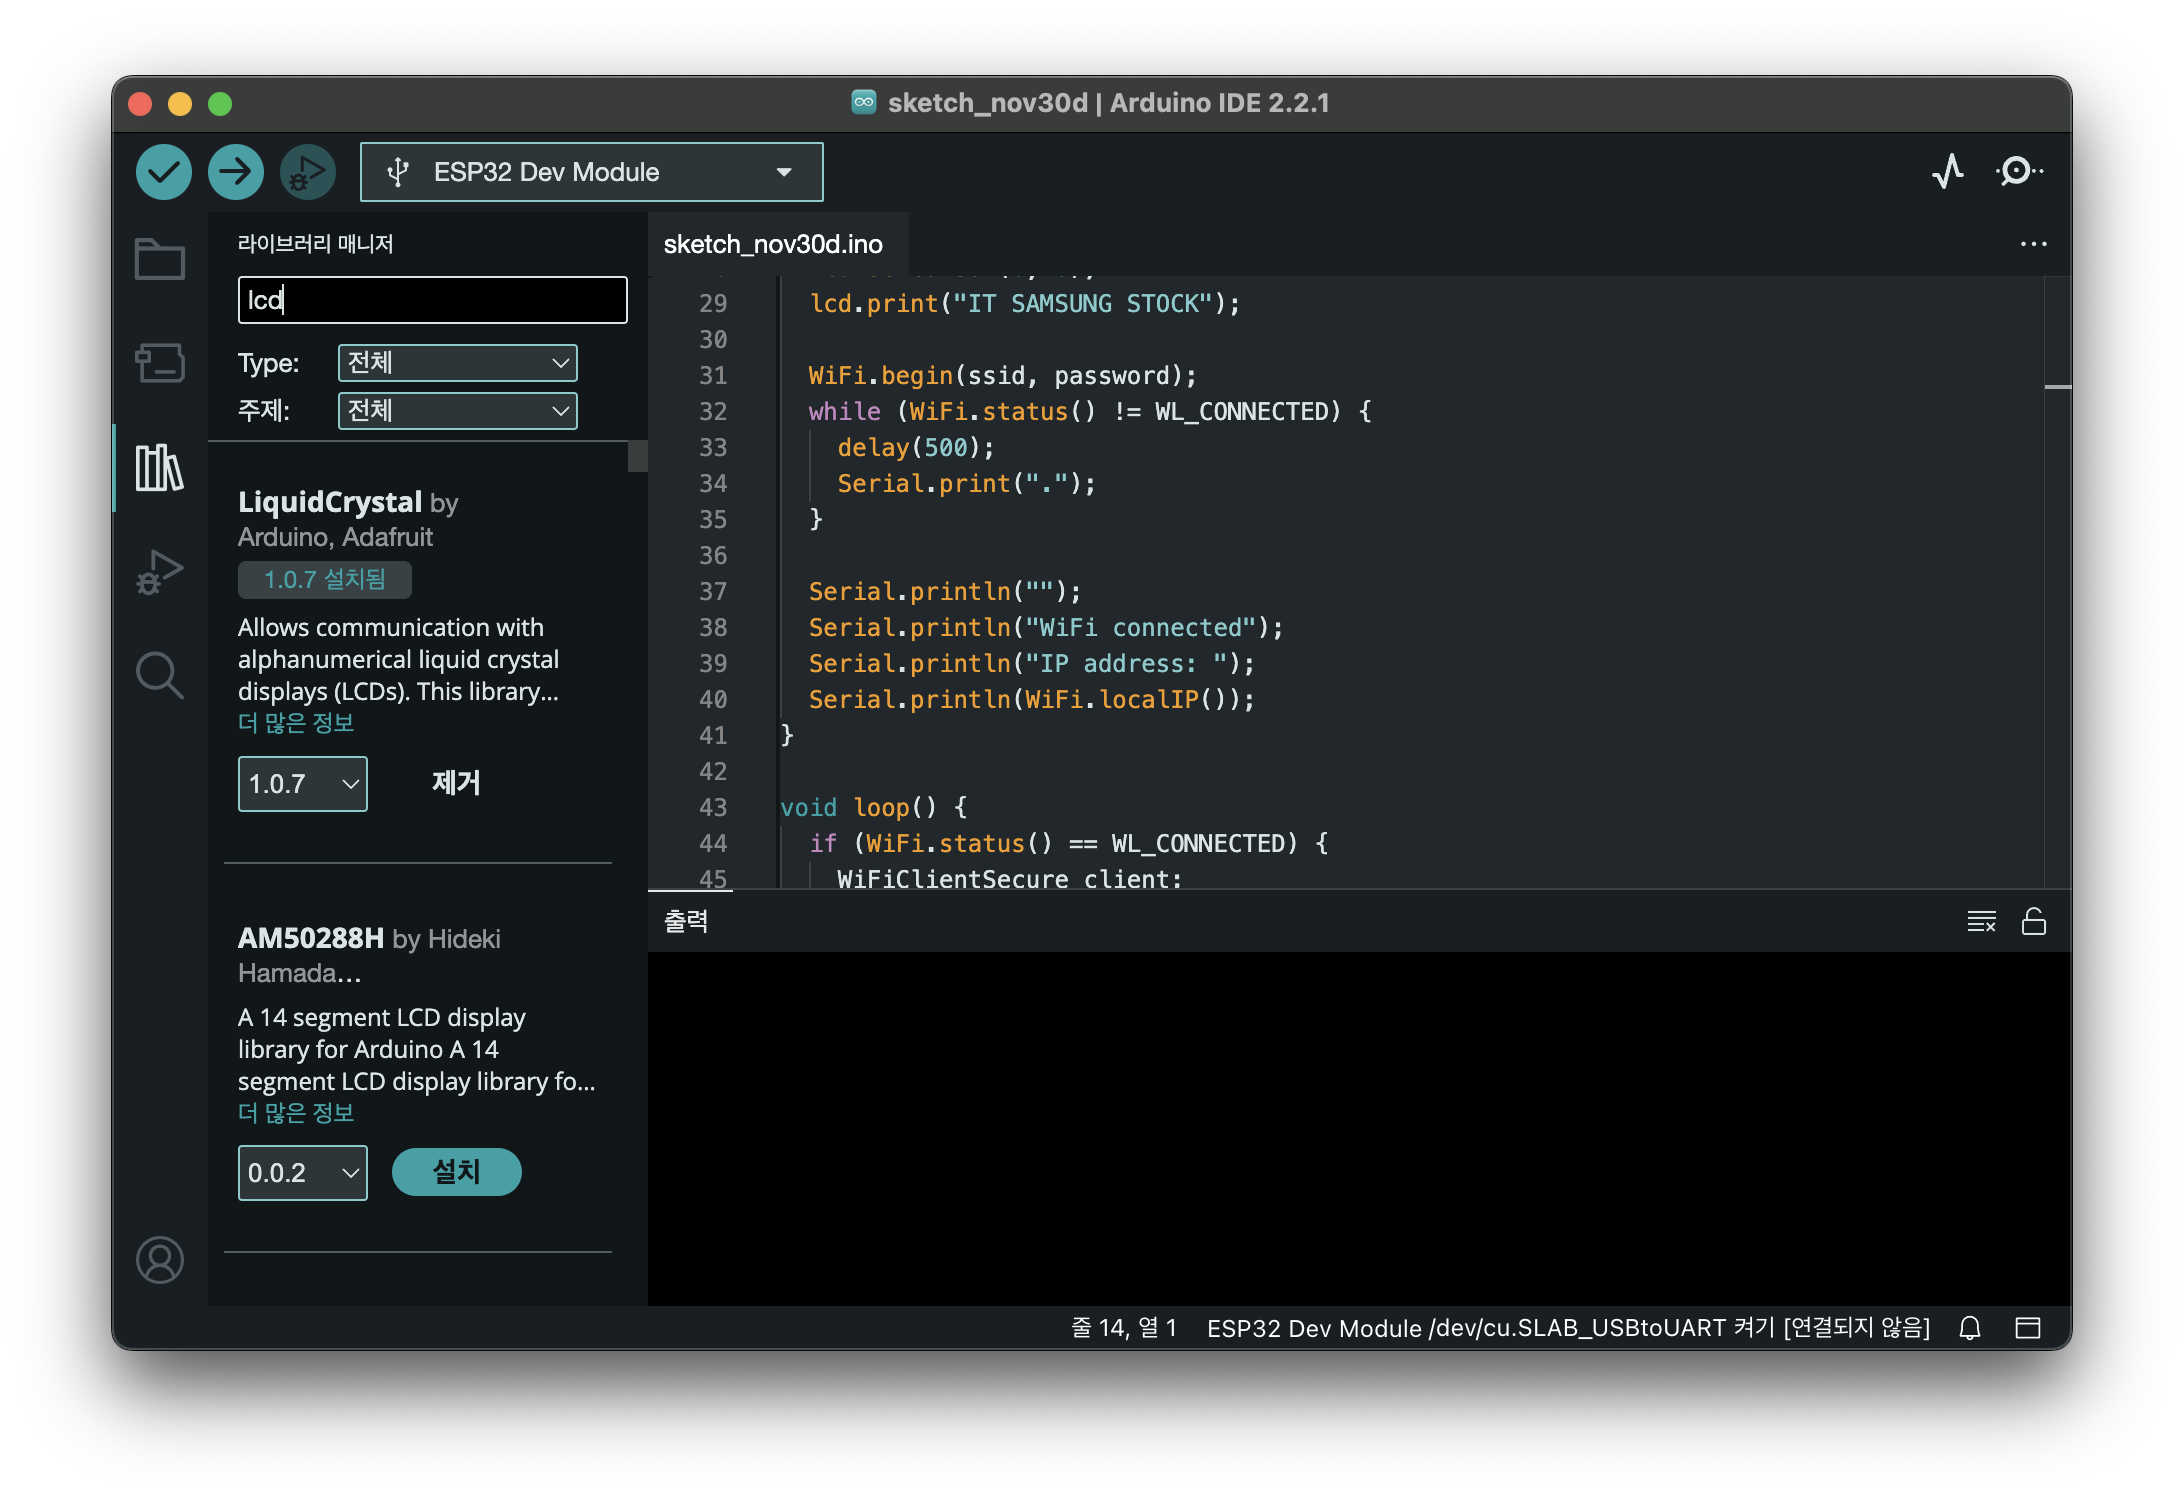
먼저 라이브러리 매니저에서 'lcd' 를 검색해서 LiquidCrystal 라이브러리를 설치한다.
라이브러리 매니저는 스케치 -> 라이브러리 포함 -> 라이브러리 관리로 들어가면 된다.
esp32 보드 라이브러리가 설치되지 않았다면 esp32 라이브러리를 먼저 설치해 주어야 한다.
esp32 라이브러리 설치는 아래 글에서 참고하자.
https://nicodora.tistory.com/34
아두이노 실습 11주차 (ESP32 보드 무선통신)
실습 11주차 (ESP32 보드 무선통신) 이번주 실습에서는 저번주에 진행했던 무선통신 실습의 연장선으로 ESP32 보드를 사용하여 실습을 진행해보려 한다. ESP32 보드 설정 먼저 ESP32 보드를 사용하기
nicodora.tistory.com
회로는 아래와 같이 구성하자.

코드는 아래와 같이 작성한다.
#include <LiquidCrystal.h>
#define LED 23
// initialize the library with the numbers of the interface pins
LiquidCrystal lcd(19, 22, 18, 17, 16, 15);

void setup() {
  pinMode(LED, OUTPUT);
  // set up the LCD's number of columns and rows:
  lcd.begin(16, 2);
  // Print a message to the LCD.
  lcd.print("INDUK ICT");
}

void loop() {
  // set the cursor to column 0, line 1
  // (note: line 1 is the second row, since counting begins with 0):
  digitalWrite(LED, HIGH);
  delay(500);

  lcd.setCursor(0, 1);
  // print the number of seconds since reset:
  lcd.print(millis() / 1000);

  digitalWrite(LED, LOW);
  delay(500);
}
실행해보면 아래 영상과 같이 LED가 1초에 한번씩 깜빡이며 1씩 증가하는 모습을 볼 수 있다.
실시간 주식시세 표시
이제 본격적으로 실시간 주식시세를 표시해 보려고 한다.
회로는 위에서 구성했던 그대로 사용한다.
먼저, 실시간으로 시세를 표시할 주식을 정해야 하는데 일단 한국에서 가장 유명한 삼성전자 주식을 표시해볼 것이다.
https://m.stock.naver.com/api/json/search/searchListJson.nhn?keyword=005930
위 링크는 아래와 같이 삼성전자 주식의 가격을 불러오는 API URI이다.

네이버 증권에 들어가서 '삼성전자'를 검색해서 들어가보면 아래 사진과 같은 화면이 나타날 것이다.
'삼성전자' 라는 이름 옆에 005930 이라는 숫자가 보이는데 이것이 삼성전자 주식의 티커이다.
티커는 간단히 말해서 주식의 주민번호라고 생각하면 된다.
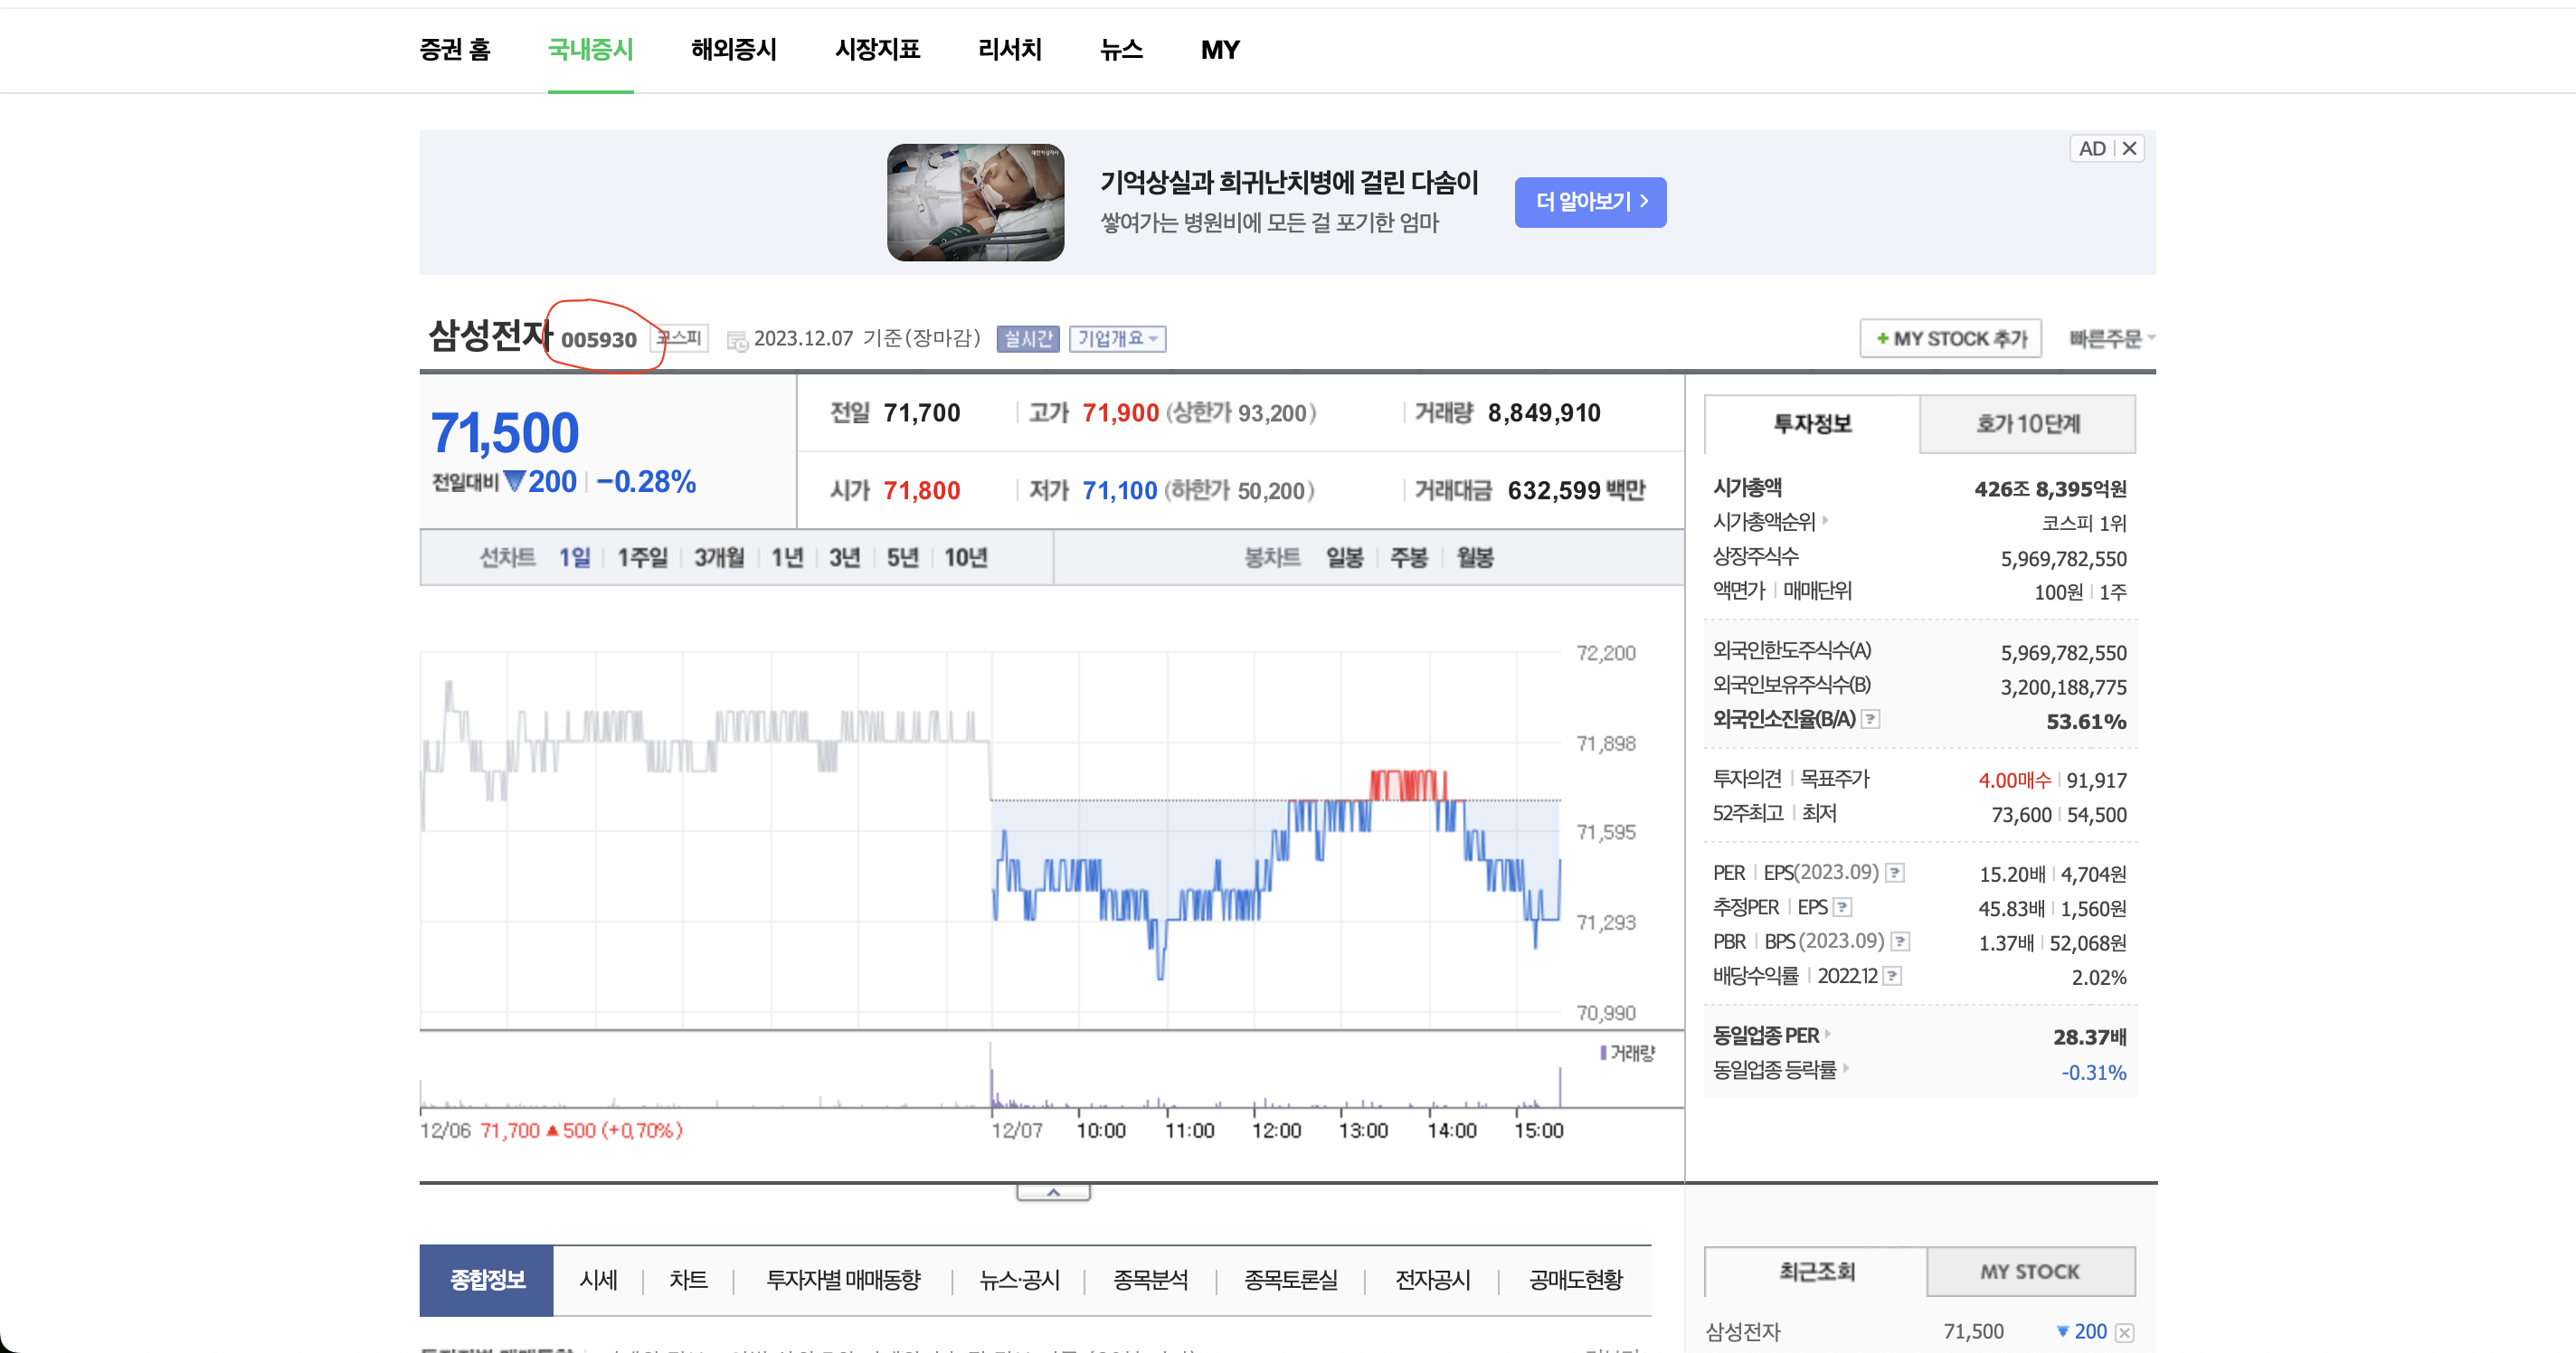
따라서 삼성전자의 주식 정보를 얻고 싶으면
https://m.stock.naver.com/api/json/search/searchListJson.nhn?keyword=005930
이렇게 keyword={삼성전자 티커} 를 입력하면 되는 것이다.
만약 다른 주식의 정보를 얻고 싶으면 네이버 증권에서 해당 종목을 검색하여 티커만 수정해 주면 된다.
그리고 위와 같은 정보를 json 타입이라고 하는데
json 타입은 키(Key) - 값(Value) 쌍으로 이루어진 표준 포맷이다.
여기서 json 타입의 데이터를 저 상태로 바로 사용할 수는 없고 파싱을 해야 한다.
파싱이란 다른 형식으로 저장된 데이터를 원하는 형식의 데이터로 변환하는 것을 말한다.
JSON 타입을 파싱한다는 말은 JSON 형식의 문자열을 객체로 변환하는 뜻이다.
대부분의 웹 통신에서는 json 타입을 주로 이용하니 알아두면 도움이 될 것이다.
코드는 아래와 같이 입력한다.
#include <WiFi.h>
#include <HTTPClient.h>
#include <LiquidCrystal.h>
#define LED 23

//Replace with your network credentials
const char* ssid = "203A_iptime";
const char* password = "";

char*url = "https://m.stock.naver.com/api/json/search/searchListJson.nhn?keyword=005930";

void setup() {
  Serial.begin(115200);
  WiFi.begin(ssid, password);
  while (WiFi.status() != WL_CONNECTED) {
    delay(500);
    Serial.print(".");
  }
  Serial.println("");
  Serial.println("WiFi connected");
  Serial.println("IP address: ");
  Serial.println(WiFi.localIP());
}

void loop() {
  if (WiFi.status() == WL_CONNECTED) {
    WiFiClientSecure client;
    client.setInsecure();
    client.connect(url, 443);
    HTTPClient https;
    https.begin(client, url);
    int httpCode = https.GET();
    if (httpCode > 0)
    {
      String payload = https.getString();
      Serial.println(payload);
    }
    https.end();
  }
  delay(10000);
}
코드를 실행하고 시리얼 모니터를 살펴보자.
시리얼 모니터에 딜레이 시간 간격으로 파싱데이터가 표시되는 것을 확인할 수 있다.
주식 가격만 가져오기
그 다음으로 주식 정보에서 가격만 가져와 시리얼 모니터에 표시해 보려고 한다.
코드를 아래와 같이 입력한다.
#include <WiFi.h>
#include <HTTPClient.h>
#include <LiquidCrystal.h>

//Replace with your network credentials
const char* ssid = "iptime";
const char* password = "";

#define LED 23

char*url = "https://m.stock.naver.com/api/json/search/searchListJson.nhn?keyword=005930";

void setup() {
  Serial.begin(115200);

  pinMode(LED, OUTPUT);

  WiFi.begin(ssid, password);
  while (WiFi.status() != WL_CONNECTED) {
    delay(500);
    Serial.print(".");
  }
  Serial.println("");
  Serial.println("WiFi connected");
  Serial.println("IP address: ");
  Serial.println(WiFi.localIP());
}

void loop() {
  if (WiFi.status() == WL_CONNECTED) {
    WiFiClientSecure client;
    client.setInsecure();
    client.connect(url, 443);
    HTTPClient https; // 변수 https 는 클라이언트 객체 https.begin(client, url);
    int httpCode = https.GET();
    if (httpCode > 0)
    {
      String payload = https.getString();
      Serial.println(payload);

      int index1 = payload.indexOf("\"nv\":");
      // “nv:” 문자열을 찾음.
      // “(큰따옴표)를 표시하기 위하여 \(역슬래쉬)를 쌍따옴표에 붙임.
      // 결국 \” 이면, 순수한 “(큰따옴표)로 표시되고, \: 이면, 순수한 : 으로 표시됨.
      int index2 = payload.indexOf(",",index1);
      // index1 에서부터 시작하여 ,(콤마)를 찾음.

      long samsungPrice = payload.substring(index1+6,index2-1).toInt();
      // ”nv:“부터 ,(콤마)까지 문자열 분리후, toInt() 를 이용하여 정수형으로 형변환

      Serial.println(samsungPrice);
    }
    https.end();
  }
  delay(10000);
}
'nv' 키의 값으로 삼성전자의 실시간 주식 가격이 담겨 있다.
따라서 nv 문자열을 찾고 그 뒤에 있는 주식 가격만 가져오는 것이다.
아래 영상과 같이 주식 가격만 따로 표시되는 것을 볼 수 있다.
이제 주식 가격만 따로 빼오는 것을 성공했으니 LCD에 표시하기만 하면 된다.
LCD에 실시간 주식시세 표시하기
마지막으로 읽어온 데이터에서 현재 가격만 분리하여 LCD에 실시간으로 주식시세를 표시해 보려고 한다.
코드를 아래와 같이 입력한다.
#include <WiFi.h>
#include <HTTPClient.h>
#include <LiquidCrystal.h>

// Replace with your network credentials
const char* ssid = "203A_iptime";
const char* password = "";
#define LED 23

// initialize the library with the numbers of the interface pins
LiquidCrystal lcd(19, 22, 18, 17, 16, 15);
char* url = "https://m.stock.naver.com/api/json/search/searchListJson.nhn?keyword=005930";

uint8_t read_park[8] = { 0x16, 0x1E, 0x17, 0x1E, 0x00, 0x1F, 0x01, 0x02 };
uint8_t read_jun[8] = { 0x1F, 0x04, 0x0A, 0x11, 0x1F, 0x04, 0x10, 0x1F };
uint8_t read_hyuk[8] = { 0x09, 0x1D, 0x0B, 0x15, 0x0B, 0x00, 0x1F, 0x02 };

void setup() {
  Serial.begin(115200);
  pinMode(LED, OUTPUT);

  // set up the LCD's number of columns and rows:
  lcd.begin(16, 2);

  lcd.createChar(1, read_park);
  lcd.createChar(2, read_jun);
  lcd.createChar(3, read_hyuk);
  lcd.setCursor(12,1);
  lcd.write(1);
  lcd.write(2);
  lcd.write(3);

  // Print a message to the LCD.
  lcd.setCursor(0, 0);
  lcd.print("IIT SAMSUNG STOCK");

  WiFi.begin(ssid, password);
  while (WiFi.status() != WL_CONNECTED) {
    delay(500);
    Serial.print(".");
  }

  Serial.println("");
  Serial.println("WiFi connected");
  Serial.println("IP address: ");
  Serial.println(WiFi.localIP());
}

void loop() {
  if (WiFi.status() == WL_CONNECTED) {
    WiFiClientSecure client;
    client.setInsecure();
    client.connect(url, 443);

    HTTPClient https;
    https.begin(client, url);
    int httpCode = https.GET();

    if (httpCode > 0) {
      String payload = https.getString();
      Serial.println(payload);

      int index1 = payload.indexOf("\"nv\":");
      int index2 = payload.indexOf(",", index1);
      long samsungPrice = payload.substring(index1 + 6, index2 - 1).toInt();
      Serial.println(samsungPrice);

      lcd.setCursor(0, 1);
      lcd.print(samsungPrice);
      lcd.print(" won ");
    }

    https.end();
  }
  delay(10000);
}
아래 영상처럼 삼성전자의 주식가격이 LCD에 표시되는 것을 볼 수 있다.
네이버 가격 표시하기
추가적으로 네이버 가격도 가져와 LCD에 표시하려고 한다.
네이버 증권에 들어가 네이버 주식의 티커를 확인해보자.
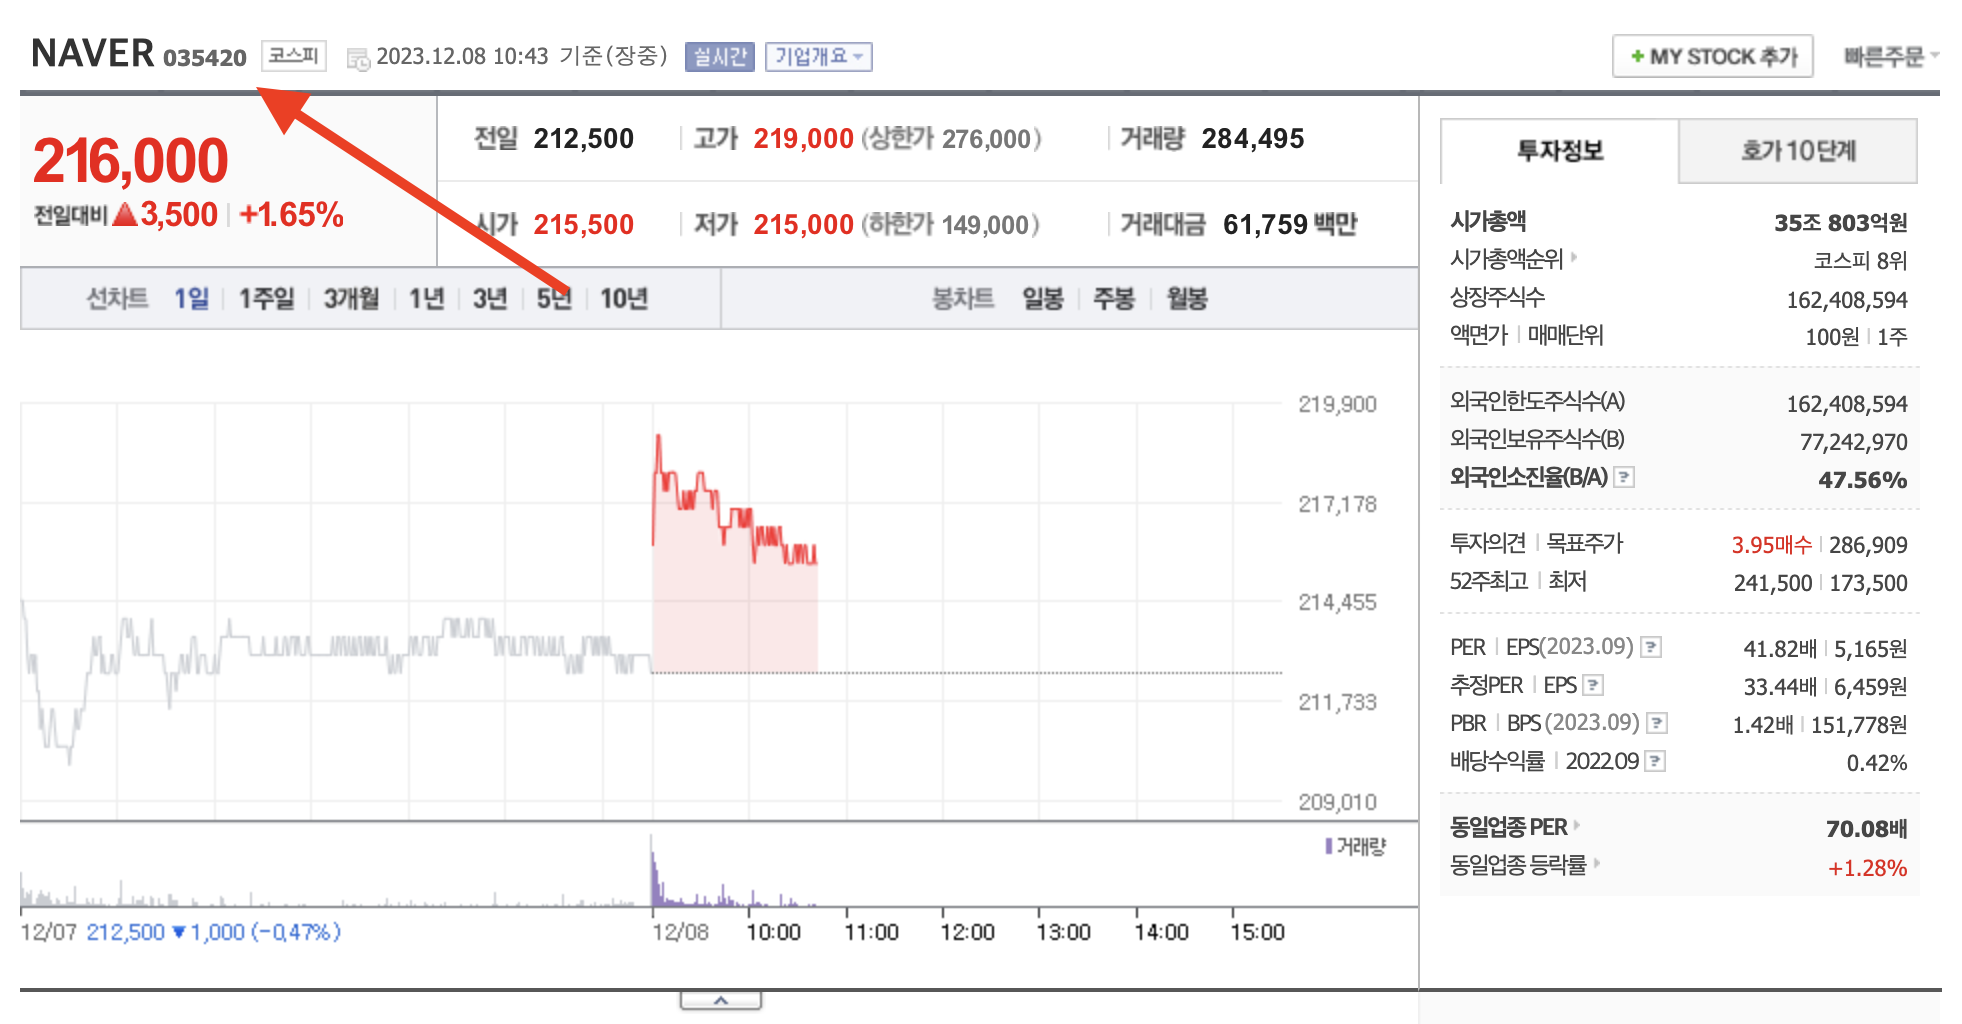
네이버 주식의 티커는 035420 이다.
그렇다면 네이버 주식 가격을 불러오는 API URI는
https://m.stock.naver.com/api/json/search/searchListJson.nhn?keyword=035420
이렇게 될 것이다.
코드를 아래와 같이 수정하자.
#include <WiFi.h>
#include <HTTPClient.h>
#include <LiquidCrystal.h>

// Replace with your network credentials
const char* ssid = "iptime";
const char* password = "";
#define LED 23

// initialize the library with the numbers of the interface pins
LiquidCrystal lcd(19, 22, 18, 17, 16, 15);
char* url = "https://m.stock.naver.com/api/json/search/searchListJson.nhn?keyword=035420";

uint8_t read_park[8] = { 0x16, 0x1E, 0x17, 0x1E, 0x00, 0x1F, 0x01, 0x02 };
uint8_t read_jun[8] = { 0x1F, 0x04, 0x0A, 0x11, 0x1F, 0x04, 0x10, 0x1F };
uint8_t read_hyuk[8] = { 0x09, 0x1D, 0x0B, 0x15, 0x0B, 0x00, 0x1F, 0x02 };

void setup() {
  Serial.begin(115200);
  pinMode(LED, OUTPUT);

  // set up the LCD's number of columns and rows:
  lcd.begin(16, 2);

  lcd.createChar(1, read_park);
  lcd.createChar(2, read_jun);
  lcd.createChar(3, read_hyuk);
  lcd.setCursor(12,1);
  lcd.write(1);
  lcd.write(2);
  lcd.write(3);

  // Print a message to the LCD.
  lcd.setCursor(0, 0);
  lcd.print("IIT NAVER STOCK");

  WiFi.begin(ssid, password);
  while (WiFi.status() != WL_CONNECTED) {
    delay(500);
    Serial.print(".");
  }

  Serial.println("");
  Serial.println("WiFi connected");
  Serial.println("IP address: ");
  Serial.println(WiFi.localIP());
}

void loop() {
  if (WiFi.status() == WL_CONNECTED) {
    WiFiClientSecure client;
    client.setInsecure();
    client.connect(url, 443);

    HTTPClient https;
    https.begin(client, url);
    int httpCode = https.GET();

    if (httpCode > 0) {
      String payload = https.getString();
      Serial.println(payload);

      int index1 = payload.indexOf("\"nv\":");
      int index2 = payload.indexOf(",", index1);
      long naverPrice = payload.substring(index1 + 6, index2 - 1).toInt();
      Serial.println(naverPrice);

      lcd.setCursor(0, 1);
      lcd.print(naverPrice);
      lcd.print(" won ");
    }

    https.end();
  }
  delay(10000);
}
이렇게 하면 아래 영상처럼 네이버 주식 가격도 LCD에 실시간으로 표시할 수 있게 된다.
비트코인 가격 표시하기
마지막으로 LCD에 비트코인 가격을 표시해 보려고 한다.
비트코인 가격을 가져오기 위해선 API가 필요한데,
필자는 업비트(Upbit) 거래소에서 제공하는 API를 사용해서 비트코인 가격을 가져올 예정이다.
먼저, 업비트에 API Document에 들어간다.
아래 링크로 들어가자.
https://docs.upbit.com/reference/ticker%ED%98%84%EC%9E%AC%EA%B0%80-%EC%A0%95%EB%B3%B4
Open API | 업비트 개발자 센터
docs.upbit.com
링크로 들어가면 아래처럼 현재가 정보를 가져오는 API 사용방법에 대해 자세히 적혀져 있다.

여기서 일단 https://api.upbit.com/v1/ticker URL을 통해 업비트에서 특정 종목의 정보를 가져올 수 있다는 것을 알 수 있다.
그럼 특정 코인의 티커를 사용해서 정보를 가져와야 하는데 티커는 어디에 적어야 할까?
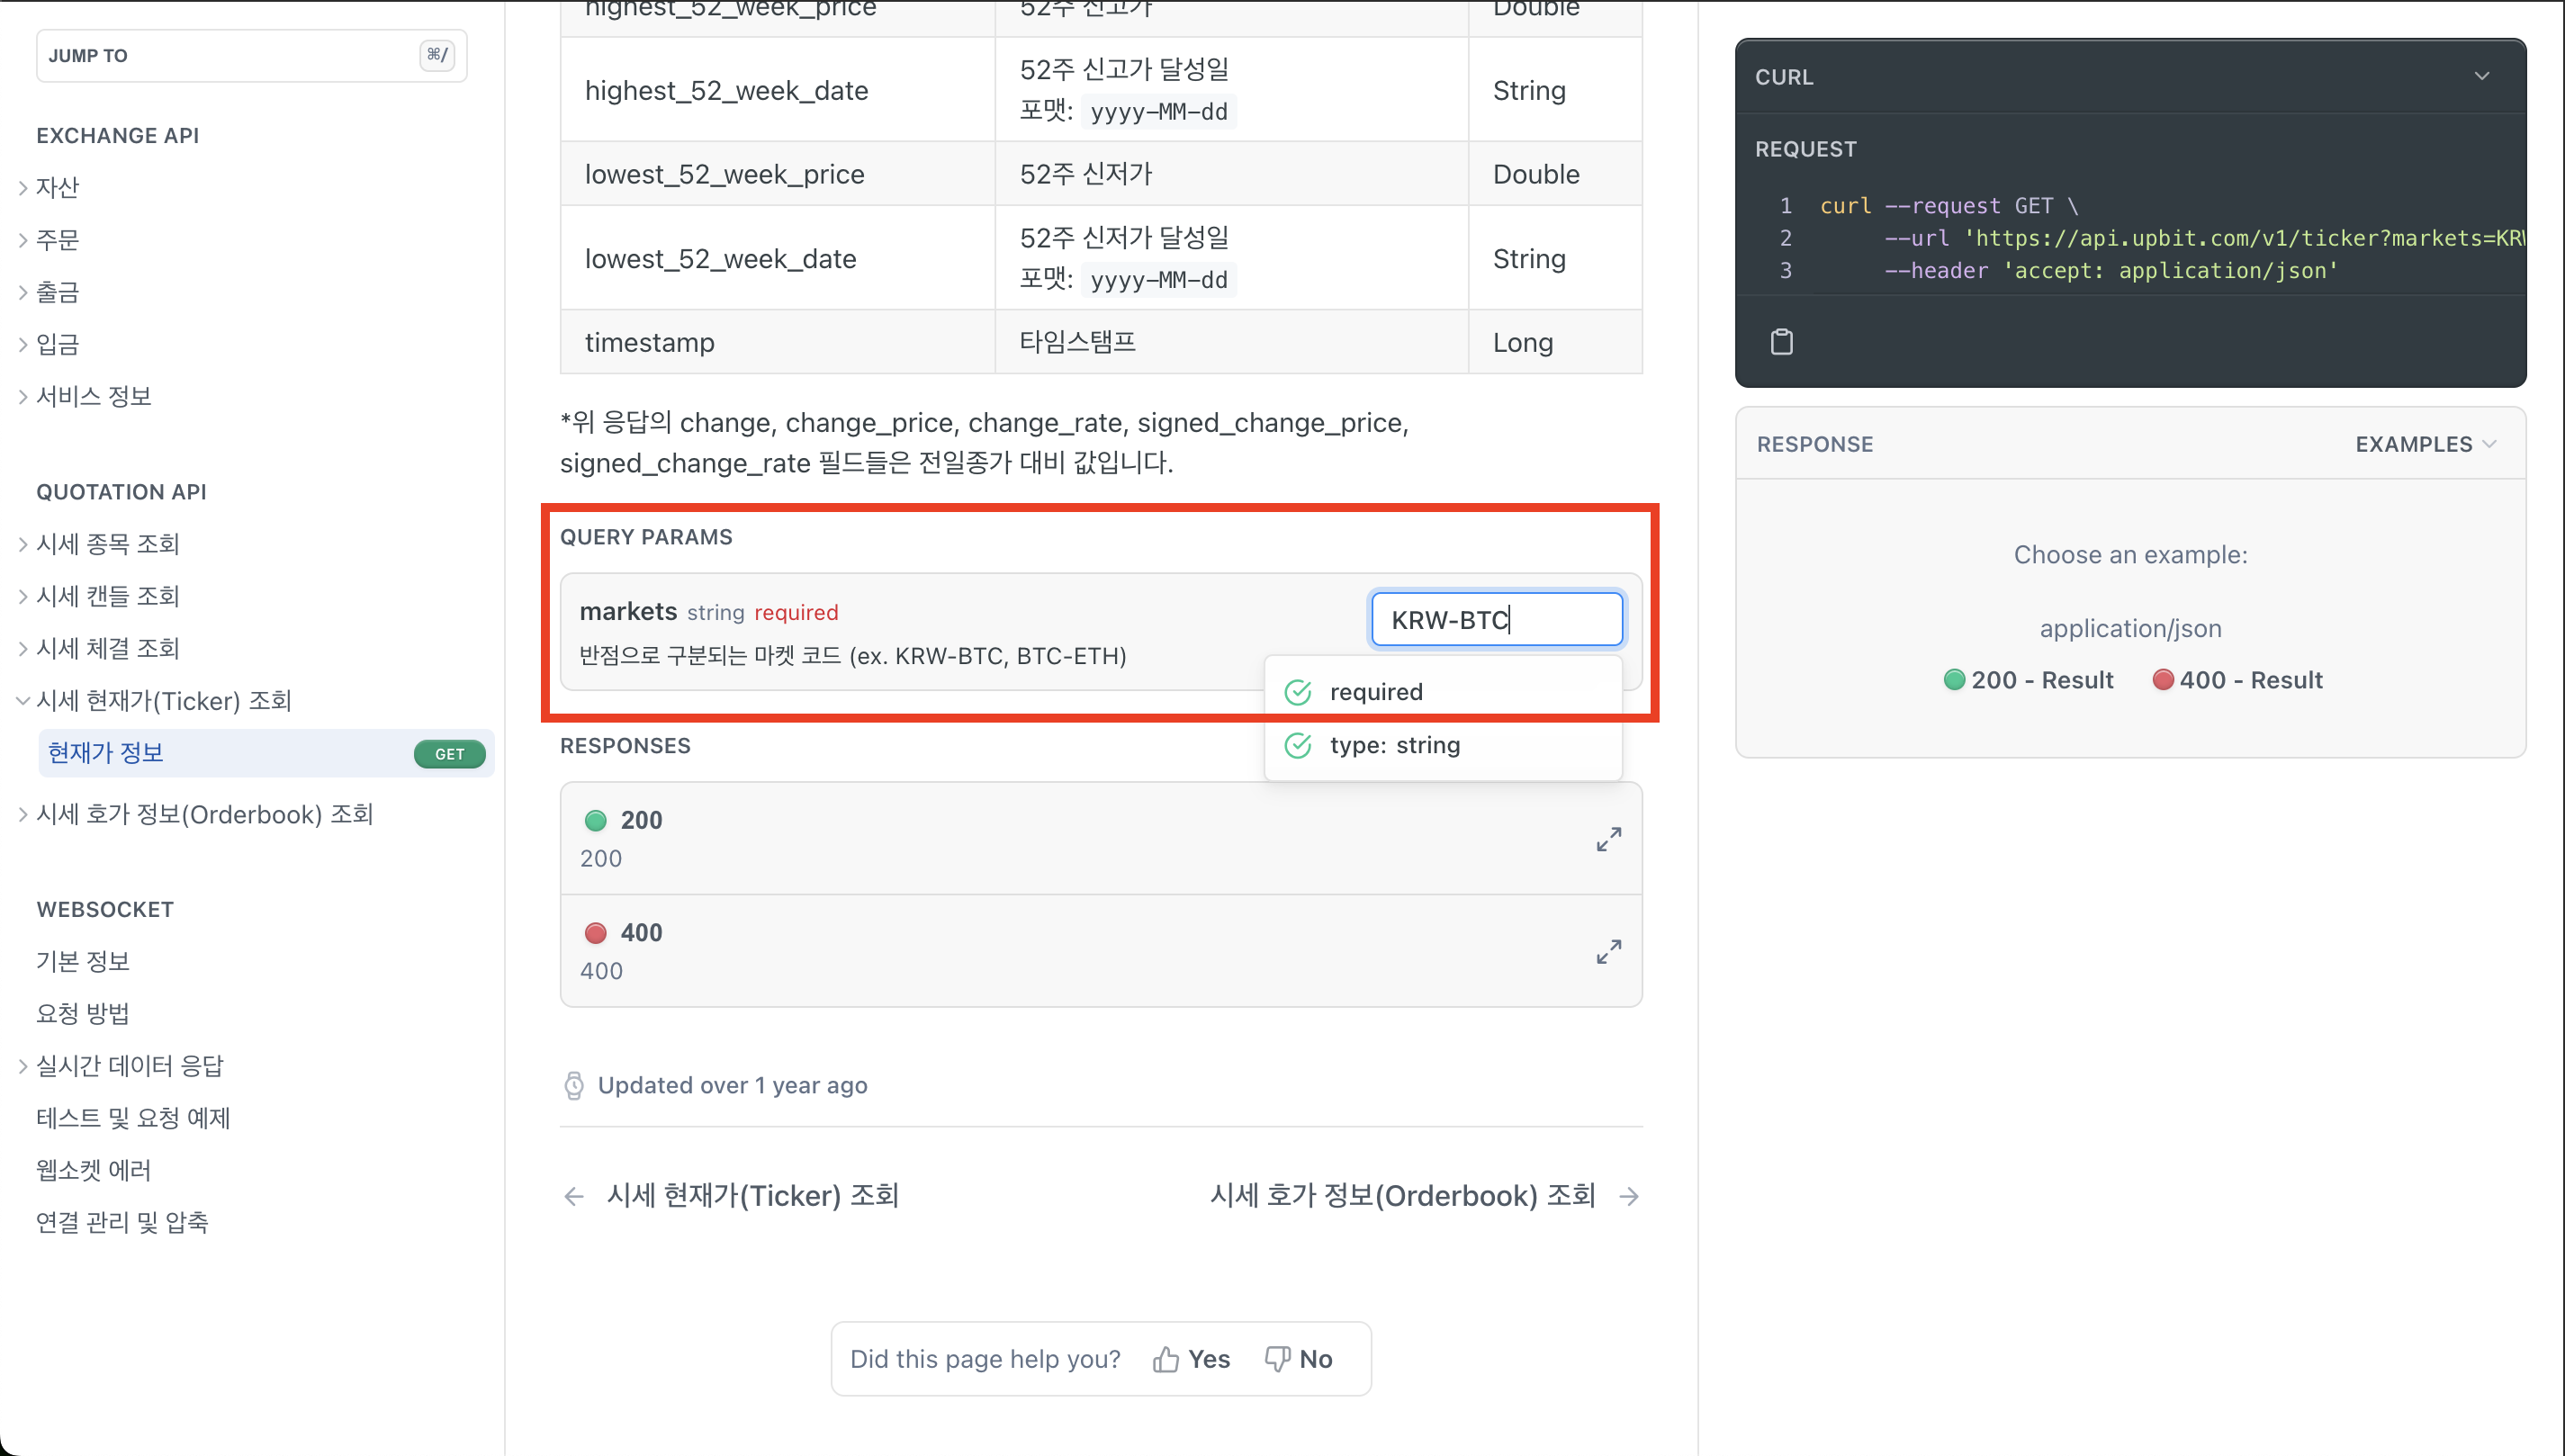
아래로 스크롤 해보면 QUERY PARAMS 라는 부분이 보이는데 이곳에서 본인이 원하는 코인의 티커를 적어 보자.
비트코인은 KRW-BTC, 이더리움 사토시는 BTC-ETH 와 같이 입력하면 된다.
(기초 화폐)-(코인 티커) 형식을 사용하자!
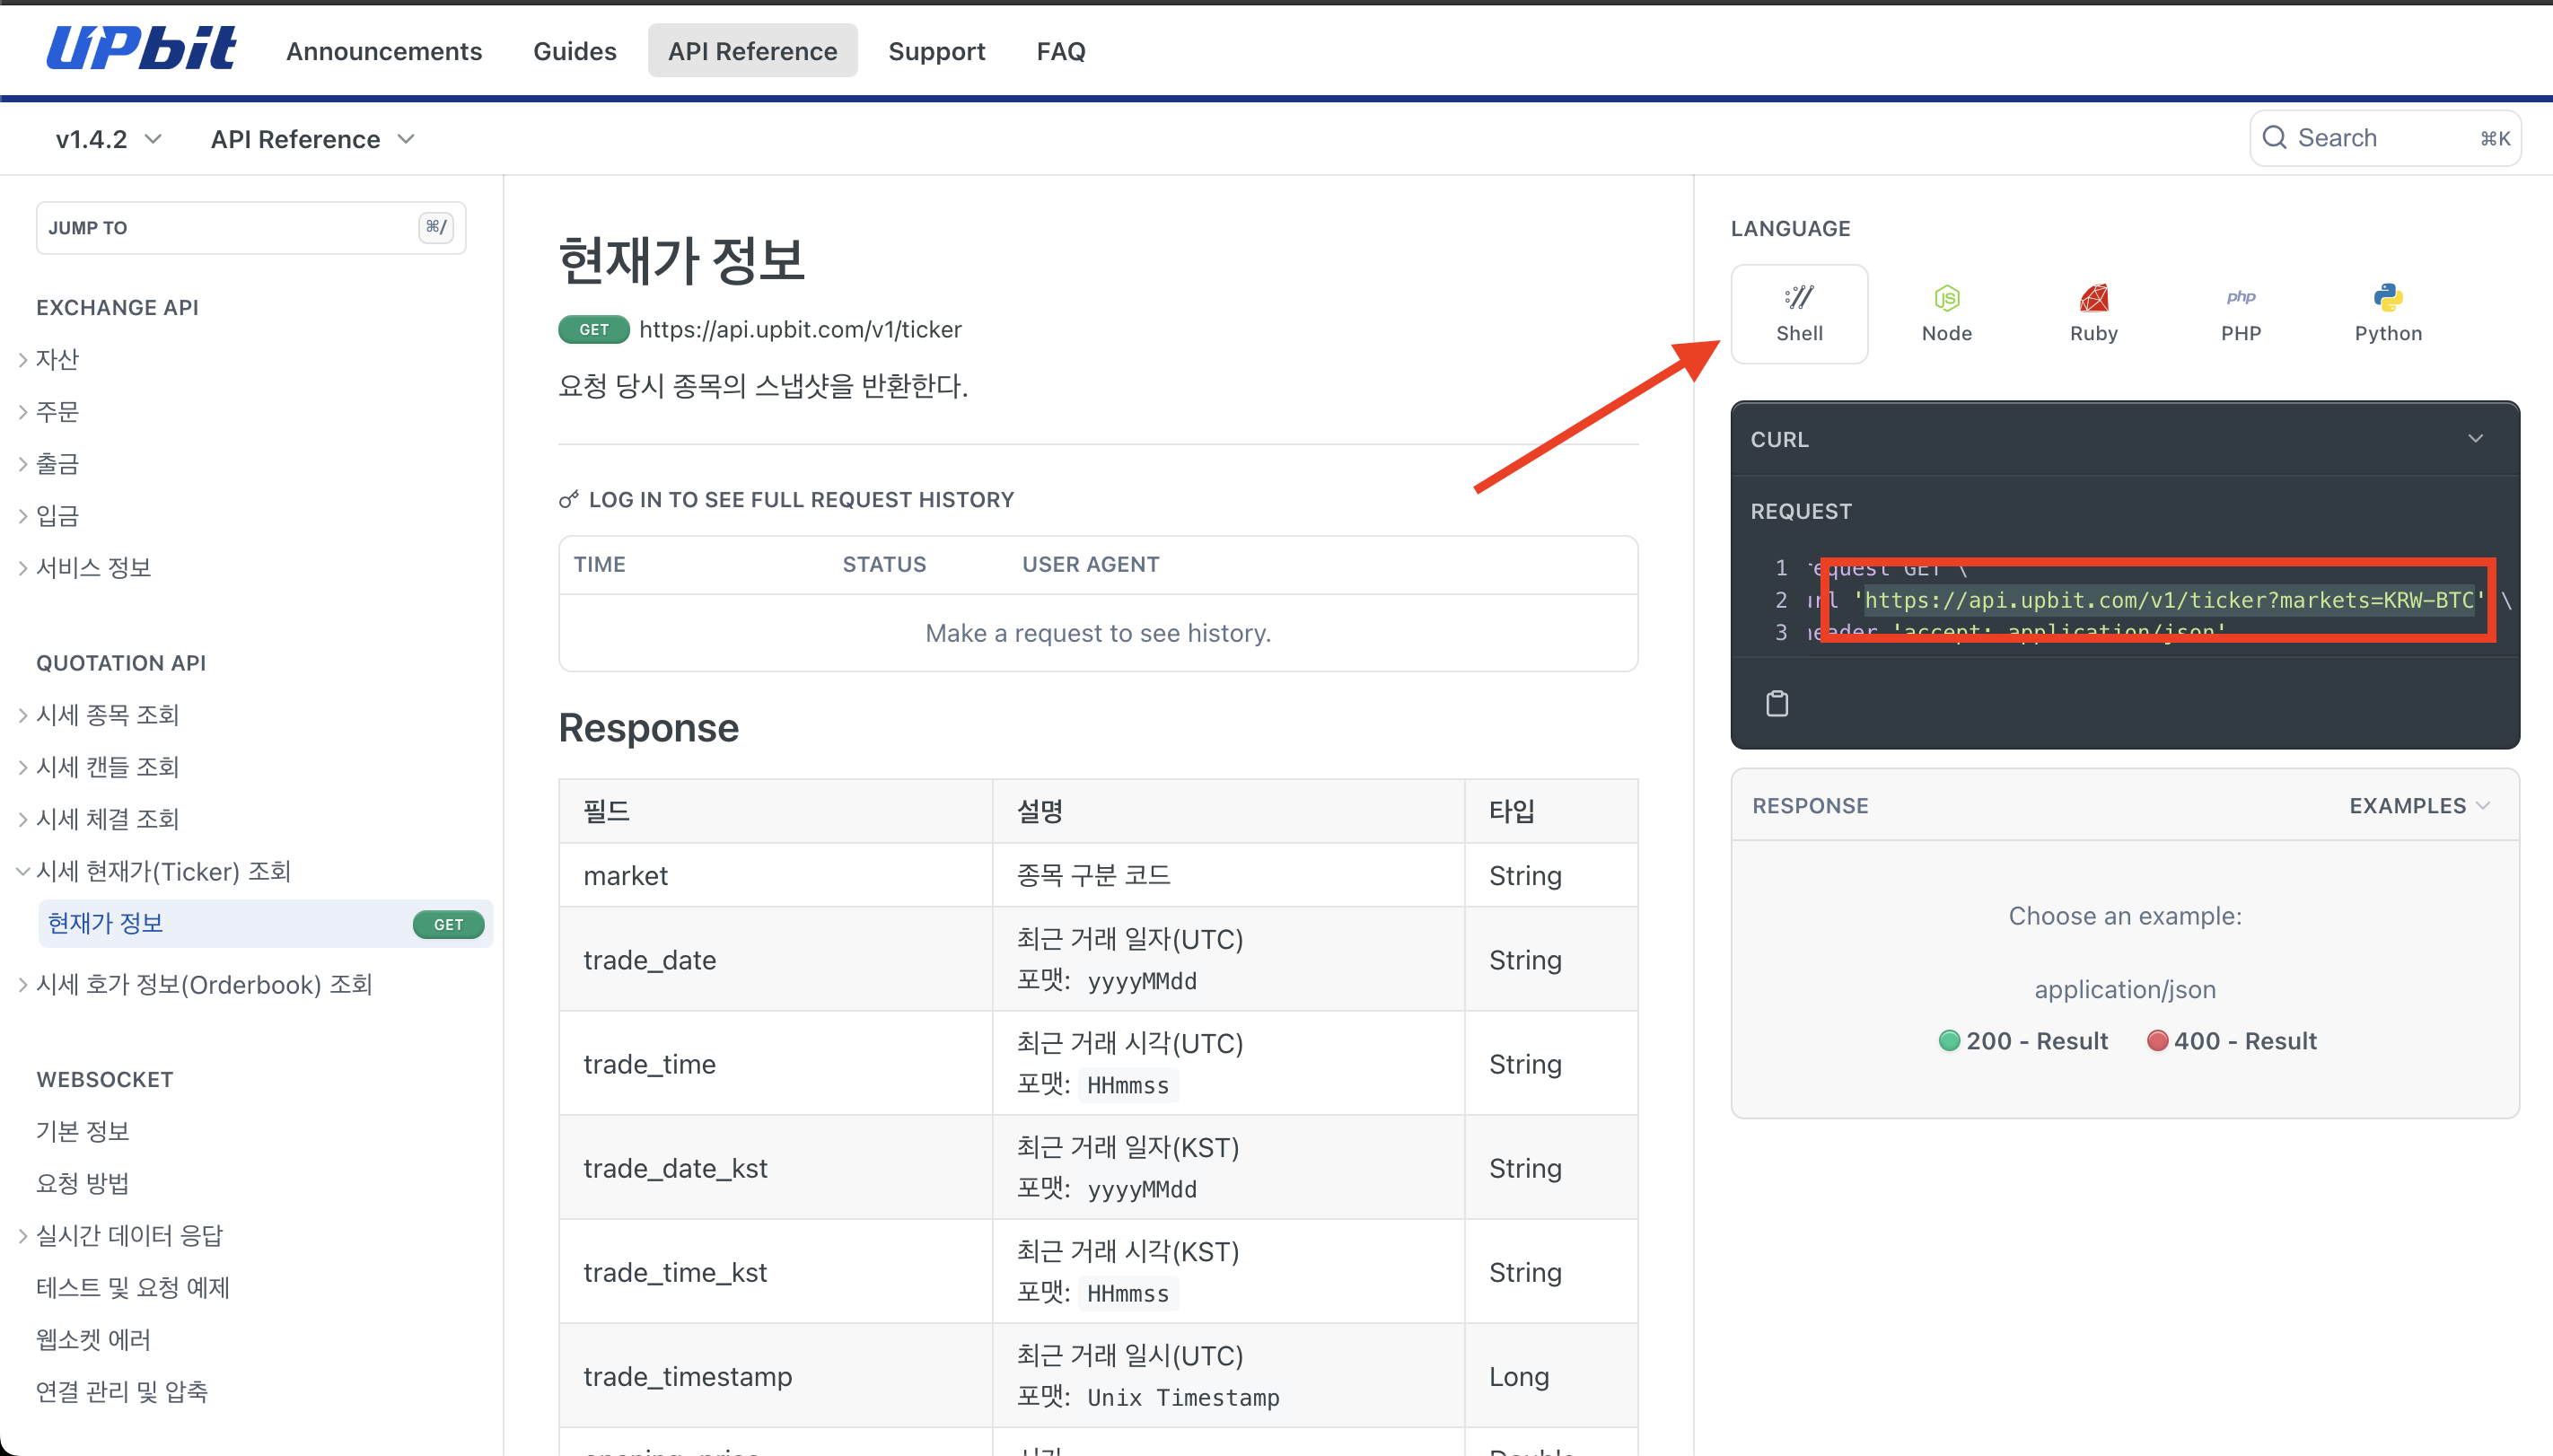
그리고 우측 박스에서 언어를 Shell로 선택 한 후,
아래 REQUEST 코드를 보면 API 요청시 필요한 URI를 확인할 수 있다.
비트코인 정보를 불러오려면 아래 URI를 사용하자.
https://api.upbit.com/v1/ticker?markets=KRW-BTC
주식 정보를 불러오는 API와 마찬가지로 markets= 뒤에 티커를 입력하면 된다.

URI에 접속해보면 위와 같은 JSON 형태의 정보가 보이는데, 여기서 'trade_price' 가 바로 현재 비트코인 가격이다.
위에서 주식 가격을 가져오는 것과 마찬가지로 trade_price 키 뒤에 있는 Value인 가격을 분리하면 된다.
코드는 아래와 같이 입력하자.
#include <WiFi.h>
#include <HTTPClient.h>
#include <LiquidCrystal.h>

// Replace with your network credentials
const char* ssid = "iptime";
const char* password = "";
#define LED 23

// initialize the library with the numbers of the interface pins
LiquidCrystal lcd(19, 22, 18, 17, 16, 15);
char* url = "https://api.upbit.com/v1/ticker?markets=KRW-BTC";

uint8_t read_park[8] = { 0x16, 0x1E, 0x17, 0x1E, 0x00, 0x1F, 0x01, 0x02 };
uint8_t read_jun[8] = { 0x1F, 0x04, 0x0A, 0x11, 0x1F, 0x04, 0x10, 0x1F };
uint8_t read_hyuk[8] = { 0x09, 0x1D, 0x0B, 0x15, 0x0B, 0x00, 0x1F, 0x02 };

void setup() {
  Serial.begin(115200);
  pinMode(LED, OUTPUT);

  // set up the LCD's number of columns and rows:
  lcd.begin(16, 2);

  lcd.createChar(1, read_park);
  lcd.createChar(2, read_jun);
  lcd.createChar(3, read_hyuk);
  lcd.setCursor(12,1);
  lcd.write(1);
  lcd.write(2);
  lcd.write(3);

  // Print a message to the LCD.
  lcd.setCursor(0, 0);
  lcd.print("IIT BitCoin Price");

  WiFi.begin(ssid, password);
  while (WiFi.status() != WL_CONNECTED) {
    delay(500);
    Serial.print(".");
  }

  Serial.println("");
  Serial.println("WiFi connected");
  Serial.println("IP address: ");
  Serial.println(WiFi.localIP());
}

void loop() {
  if (WiFi.status() == WL_CONNECTED) {
    WiFiClientSecure client;
    client.setInsecure();
    client.connect(url, 443);

    HTTPClient https;
    https.begin(client, url);
    int httpCode = https.GET();

    if (httpCode > 0) {
      String payload = https.getString();
      Serial.println(payload);

      // Find the index of "trade_price"
      int index1 = payload.indexOf("\"trade_price\":");
      int index2 = payload.indexOf(",", index1);
      String tradePriceStr = payload.substring(index1 + 14, index2);
      long bitcoinPrice = tradePriceStr.toInt();
      Serial.println(bitcoinPrice);

      lcd.setCursor(0, 1);
      lcd.print(bitcoinPrice);
      lcd.print(" won");
    }

    https.end();
  }
  delay(1000);
}
아래 영상과 같이 비트코인 가격이 잘 표시되는 것을 볼 수 있다.
실습 설명 영상
주식 가격을 LCD에 표시하는 실습에 대한 설명 영상입니다.
비트코인 가격을 LCD에 표시하는 실습에 대한 설명 영상입니다.
'아두이노 (Arduino)' 카테고리의 다른 글
| 아두이노 실습 11주차 (ESP32 보드 무선통신) (0) | 2023.11.29 |
|---|---|
| 아두이노 실습 10주차 (무선 통신) (1) | 2023.11.22 |
| 아두이노 9주차 (블루투스) (1) | 2023.11.15 |
| 아두이노 실습 9주차 (디스플레이 활용하기 추가 실습) (0) | 2023.11.15 |
| 아두이노 실습 8주차 (디스플레이 활용하기) (1) | 2023.11.01 |